


![[RSS]](https://lh3.googleusercontent.com/blogger_img_proxy/AEn0k_tccYE8clXZQWFVBXQas8WJaeAEpM573kx1iR_QKJvPnnf4hHrlx6TTY9aXSNCH9Bsf5rl1oFkSudIdqEYeMpzs8966kcilTppHCtSjlb0puzHThloOHLYesbxlYg=s0-d)
Recenty, I have come across an excellent technique by which we can transfer the cassette audio to the computer, in MP3 format. Thus, the songs can then be burned on an Audio CD or copied to mobile phones. You can also use this technique to make a backup copy of the Audio.
Showing posts with label Tips and Tricks. Show all posts
Showing posts with label Tips and Tricks. Show all posts
 E-mail this article
Recovering permanently deleted files
Permanently deleted data includes data deleted from the Recycle Bin & formatted data.
Have you ever faced a situation where you have accidentally deleted an important file from the Recycle Bin? It is generally considered that once this happens, it is impossible to recover it. But actually, such deleted files can be recovered, though the chances of it decreases as time passes. You will need a Data Recovery software for this purpose.How to change the location of My Music, My Pictures, etc.
Windows contains special folders like My Music, My Pictures, My Videos & My Documents. These folders are default for their respective files. This means that :
These folders are located in the local drive (The drive on which Windows is installed) And, we cannot change its location directly, except that of My Documents. This can act as a dis-advantage in many cases. Fortunately, this location can be changed with a simple trick.
This can be useful in many ways. Example. You may have a large music collection in a different location than the My Music folder. Then, you may wish to automatically rip Audio CDs to that different location rather than the My Music Folder. This can easily be done by changing the default location of the My Music folder to your particular folder. The same applies for Video, Picture or Document collections.
So, for changing the location of a special folder,
For Windows XP :
1. Download Tweak UI, a Windows XP Power Toy.
After installing, open it from Start --> All Programs --> Powertoys for Windows XP --> TweakUI.

2. Expand the My Computer tab & click on Special Folders.
3. Select the special folder that you wish to change.
(Note : Don't select the same location for two or more different special folders, & do not point a location to system folders like 'Fonts')
4. Then, change the location to your preferred folder.
That's it! Now, the folders will point to your chosen location.
Login to multiple IMs without any software
Instant Messaging is an excellent feature of the Internet. Just by connecting to the Internet, people can chat, talk & even see each other, though they may be very far away physically.
There are several comanies which provide this service to their users. However, with the exception of some services, to be able to chat, you need to install an application on the PC. (Ex. Windows Live Messenger by Live mail) In addition, this software only supports its respective chatting platform. Thus, to use different chatting platforms, one needs to install many different programs.


All these problems can be solved by using Meebo or IMO.im. Both of these are online applications that empower you to use multiple chatting platforms at once right from your web browser, without the need of any software.
Meebo :
Imo.im : This tool has a special feature by which you can link all your accounts with one another, without the need to create an account with the tool.
Note : There are also many softwares for using multiple chatting platforms simultenously. But, this articles focusses only on the online applications.
Search multiple search engines at once
Everyone generally has a preferred search engine which is used to fulfill all one's search needs. But sometimes, when searching for rare topics, that one search engine may not give the required results. Thus, one then uses some other search engine for the search. This, in turn, gives several duplicate results & it too, may not give the required results.
Thus, when searching for rare topics, it is advisable to search multiple search engines at once. There are many online tools available for this purpose, which are called Meta search engines. These tools search major search engines for your query & then present to you the results together, with the search rankings determined by the average rankings from the concerned search engines. These tools are listed & explained below :
How to reduce your Internet's data transfer
Sometimes, when monitoring your Internet's data transfer, you might notice that you have transferred a lot of data & that your download limit might finish very soon. Thus, you will need to reduce your rate of data transfer. Here are some tips to do so :
Turn off images :
Images have a much higher size than regular text. Thus, the more the images loaded, the more is the data transferred. Thus, you ahould turn off image loading from your browser's settings.
Turn off other extras :
Similarly to images, disabling extras like pop-ups, Java, Javascript, etc. too helps in lowering data transfer. Note that some features in some sites may not work with Java / Javascript disabled. So, you can enable them temporarily if the features are important.
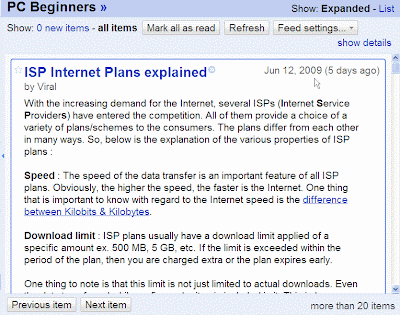
Take advantage of RSS Feeds :
The RSS feed of PC Beginners in Google Reader Many sites (like this one) offer RSS feeds of their content. If the sites that you visit contain RSS feeds, then subscribe to the required feed in a reader & then read the article from the reader. By doing this, only the article will be loaded excluding the other parts of the web-site. This will reduce
data transfer.
How can one know whether a site contains feeds or not?
Look for the RSS icon  in the web page. If the page contains RSS feeds, then the RSS logo icon will be usually present in it. You can subscribe to the feed by clicking on the icon.
in the web page. If the page contains RSS feeds, then the RSS logo icon will be usually present in it. You can subscribe to the feed by clicking on the icon.I will write more points in this article once I find them.
How to speed up your PC
1. Remove spywares & viruses :
Viruses & spywares are one of the major & most common reasons of PC slowdown. This is because, they use up the majority of the available memory for their unethical activities. And, the remaining memory is shared by the other programs. Thus, as the programs have to suffice with low memory, slowdown is caused. Therefore, removal of spywares & viruses is the first step towards a speedy PC.
Related : How to stay safe from Viruses
2. Clean & defragment :
In course of time, the PC gets filled up with lots of junk files, gets fragmented & takes a lot of time to carry out simple tasks. Thus, for fixing this problem, you will need to clean & defragment your PC.

i) Cleaning up the junk files is a very easy task these days thanks to free, simple & powerful utilities like CCleaner & Advanced SystemCare Free. Using these tools, you simply need to select the junk items to remove, start the cleaning process & within
a couple of minutes, your PC will be clean! You can clean several junk items like temporary Windows files, obsolete registry entries, browser data, etc. using these softwares.
ii) As data moves from one place to another in a PC, it becomes fragmented, as a whole. This also acts as a reason for slowdown. Thus, it is important that you regularly defragment your PC drives for a quick PC. There are several utilities like Auslogics Disk Defrag, Smart Defrag, etc. For this purpose. You can occasionally defragment the Windows Registry as well.
You should clean & defragment your PC regularly twice a month to maintain its efficiency & quickness.
Related : Keep your registry defragmented
3. Disable unnecessary Windows services :
Windows provides a variety of services to us. However, many of these services are not at all useful for most types of users. These services use up extra memory, causing slowdowns for other programs. Thus, disabling some of these services will help in quickening up the PC. The following services can be safely disabled :
ClipBook
Remote Registry
Telnet
NetMeeting Remote Desktop Sharing
Alerter
Error Reporting Service
Messenger
Print Spooler (if you don't use a Printer)
To disable the services, go to Start --> Run --> services.msc. Then, right-click on the concerned service, click on Properties & change the Start-up Type to Disabled.
For information on why the given services should be disabled, check the main article on disabling unnecessary Windows services.
Decrease the programs on Start-up :
The Startup list is a list of the applications that start along with Windows. Many applications put itself on the Startup list by default. The more the programs on it, more programs will run, which will slow up the PC. So, it is recommended to reduce the number of programs on the Startup list to speed up the PC. You can do so from the Startup tab of the 'Msconfig' utility (Open it from Start --> Run --> msconfig)
[Older PCs] Turn off visual effects :
One of the various features that Microsoft® Windows XP & Vista has over the previous versions is its display effects. For example, the colorful start menu, shadow effects, etc. It definitely adds up to the display value of the OSes. But for slow computers, the effects lead to slower PC performance. Therefore, it is highly recommended to turn off all the visual effects if you are using an older PC.
You can disable the extra effects from Start --> Right-click on My Computer --> Properties --> Advanced --> Settings (1st).
So, good luck in speeding up your PC!
Disable unnecessary Windows services
The Windows operating system provides a host of services which help us in several ways. But, the more the services enabled, the slower the PC becomes. And, there are various services which are not at all useful for most types of users. These services should be disabled so that the PC doesn't unnecessarily consume extra memory & become slow.
So, first of all, here is how you can disable a particular service :
1. Open 'services.msc' from Start --> Run.

2. From the list present in the application, right-click on the service you wish to disable & click on Properties.

3. Now, in startup type, you can select Disable to disable the service or Manual to forbid the service from automatically starting.
And now, given below is a list of services that can be disabled (with reasons) :
--------------------------------------------------------------------------------------------
Note : The 4 services given below are useful if the PC is accessed remotely, ie., from another PC. And usually, the majority of users never use Remote access. If you are one of them, then you can disable the 4 services :-
ClipBook : This service helps to share information with Remote computers.
Remote Registry : Enables remote users to modify registry settings on your computer.
Telnet : This service is used to facilitate remote users in opening programs on your PC.
NetMeeting Remote Desktop Sharing : This service enables us to view our desktop remotely using NetMeeting.
------------------------------------------------------------------------
These services can be disabled too :
Alerter : This service helps in giving administrative alerts to the user. However, it can be used by hackers to harm the PC. Thus, it should be disabled. It is disabled by default in XP SP2 & is not present in Vista
Error Reporting Service : This service helps in reporting errors to Microsoft. However, if you don't wish to report errors, you can disable this service.
Messenger : This service is used for communication within a network. It too, can be misused by hackers. Thus, it should be disabled. It is disabled by default in XP SP2 & is not present in Vista
Print Spooler : It loads files to memory for later printing. If you do not use a printer, disable this service.
How to remove tough Viruses
Earlier, I had published an article on staying safe from Viruses. But even while following all precautions, a Virus may still enter your PC. Fortunately, almost all the viruses will get repaired or deleted by scanning your PC with a good anti-virus software. But, there are certain viruses that cannot be removed by an anti-virus software. So, to remove such tough viruses, one can :
(Note : The anti-virus will give you the name of the virus, the name of the infected file & its directory when it informs you of its inability to remove the virus.)
1. Scan the infected file with other anti-virus softwares :
Note down the name & directory of the infected file. Then, scan that particular file/directory with another anti-virus program. This should most probably remove the virus. If not, then,
2. Search for the virus' removal tool :
There are many such viruses which the anti-virus programs cannot remove. For some of these viruses, specially designed removal tools are created & are available in various places on the Web.
To search for a removal tool,
1) Open your favourite search engine & search for the tool by using the following syntax : " 'Virus Name' removal tool" (without quotes) where 'Virus name' be replaced by the name of the virus.
ii) Then, from the list of search results, visit a result that you find more relevant.
iii) The resulting page will provide a download of the removal tool. Thus, downlad the removal tool & follow its instructions properly to remove the virus.
If you cannot find a tool, then
3. Revert your PC to a previous date :
Note : To use this technique, you will need to know the date when the virus infected the PC.
Note 2 : This option can only be used if the PC has System Restore enabled. And further, system restore is only available in Windows ME, XP & Vista.
By using the System Restore feature, you can revert your PC to a previous date. This will turn the PC into exactly how it was on a previous date, which will obviously remove the virus, undo all installations, data changes, etc. done between the current & reverting date. Thus, before reverting, make sure that you save all your important changed data to an external medium like CD, Pen drive, etc.
Then, to revert your PC to a previous date :
1. Start System Restore. (From Start --> All Programs --> Accessories --> System Tools --> System Restore )
2. Select the option 'Restore my computer to a previous time (XP) / Choose a different restore point (Vista) & click on Next.
3. Then, select the date to which you wish to revert your PC. (The date selected should be the earliest date before the date when the virus infected the PC)
4. After this process, the virus should get removed.
Thus, these are some ways by which a tough virus can be removed. Good luck in the removal of your PC's virus!
How to find Software help effectively
There are many instances when working with a software that one does not know how to perform a particular function or does not possess the required knowledge. In such cases, one needs help. Here is what you should do for effectively finding help :
1. Check the Help file : Most softwares come with a help file built in. This file tends to fully cover all aspects of the software. Thus, it is likely that all your help needs will be fulfilled by it.
You can access this file by pressing the F1 key or going to Help --> Contents. After opening the file, you can either go through its different sections or search for a term from the search tab, to get the information you need.
2. Online help : Some companies offer online help for their products. Thus, you can visit the product's web site (You can find the web page address from Help --> About). Then, you can search for the required information in a way similar to how you find help from the help file.
3. Search : You can also seek the info by searching for it on the Net. There are many reliable info sources online which can guide & inform you.
You can use the syntax "how to *** using 'software'" or "what is *** in 'software'" (without the quotes) where *** stands for the required info & 'software' stands for the name of the concerned software.
4. Ask : You can ask for the required info in sites like Yahoo! Answers, Wiki Answers, etc. or in blogs (like this one) By this way, you will most probably get your answer. And, there's also the traditional way of asking an expert PC friend for the information!
Thus, these are the ways by which you can get help for a software effectively.
How to stay safe from Viruses
Viruses are one of the most common problems for the PC users. They are very troublesome since they can result in slowdowns, instability, crashes, data loss, etc. So, here are some basic tips on being secure from viruses :
1. Use a good anti-virus software : This is the preliminary step towards a virus-free PC. AVG & Avast! Home Edition are powerful free anti-virus programs. Both of them provide excellent virus protection for the PC user.
Note : DO NOT use more than 1 anti-virus at the same time. Since anti-viruses offer real-time protection, using more than 1 anti-virus will cause conflicts between them, resulting in crashes. slowdowns & loss of efficiency.
2. Keep your Virus definitions updated before a scan : Virus definitions contain information on viruses for the anti-virus software, including removal details. Since several new viruses are created daily, these definitions are regularly updated by the anti-virus companies. If you scan your PC using old definitions, new viruses will not be detected. Thus, we should keep our virus definitions updated before scanning the PC.
3. Scan your PC regularly : As a general rule, you should scan your PC once a month (with updated virus definitions, of course) to ensure that you are protected from virus infections.
4. Scan removable media before use : Removable media (Pen Drives, CDs, DVDs, Floppies, etc.) are very useful as they facilitate easy moving of data between different PCs. But sometimes, an infected file may get copied onto the removable media. This infection can then spread to the other PCs where it is inserted. Thus, one should always scan any new removable media before copying any of its files to our PC .
4. Scan removable media before use : Removable media (Pen Drives, CDs, DVDs, Floppies, etc.) are very useful as they facilitate easy moving of data between different PCs. But sometimes, an infected file may get copied onto the removable media. This infection can then spread to the other PCs where it is inserted. Thus, one should always scan any new removable media before copying any of its files to our PC .
Why uninstall is better than delete
Many beginners are confused between the difference in deleting & un-installing a program. Sometimes, they simply delete the entire folder in which the software is located to remove the software. This is wrong. The reason is explained below :-
When a software is installed, the following things are added to your system :
- The main folder, with the software files.
- Entries in the Windows Registry, related to the particular software.
- Some softwares also store settings in My Documents or files in the System folders.
That is why, we should un-install the software to remove it.
How to write special symbols like ©, ∆, ™, ¼, etc.
There are several symbols like ±, ∑, ∏, ≠, ® which are unavailable on the keyboard. But, we may need to type such letters sometimes. Fortunately, Windows bundles a software for this purpose, which is very easy to use.
So, to insert special characters :
1. Click on Start --> All Programs --> Accessories --> System Tools --> Character Map.
OR Open 'charmap' (without the quotes) from Start --> Run.
 |
|
| Accessories --> System Tools --> Character Map | Start --> Run --> 'Charmap' |

 2. Now, select the special symbol that you want. Alternatively, you can search for a particular symbol from the search tab in advanced view. You can even specify the character set to use (including Greek, Arabic, etc.)
3. Click on Select, copy the character, & paste it where you need it.
Or, if you wish to use these characters frequently, you can note down the shortcut key (as shown in the above picture as a red rectangle) for the concerned special character & use it whenever needed.
Converting complex units into easy-to-understand objects
Ultimate unit Converter is a unique site which converts complex technical units into sensible easy-to-understand units.
For ex. entering 1 hectare will give you results like 2 hockey fields, etc. in the Real Objects category. Therefore, we can easily assume the approximate measures of difficult units, due to the usage of commonly-seen units. It is a must-see site for all Internet surfers.
How to brighten a dark picture
Have you ever captured a very dark picture in your digital camera by mistake? You would obviously have wanted to make it more life-like & visible by adding lightning to it. And luckily, you can do so very easily.
There are several tools available for this purpose. I personally use Picasa. Here's a quick walkthrough on adding lightning to a dark picture through Picasa :
1. Open the file from within Picasa.
2. Click on "I'm feeling Lucky".
3. You will now see the improved version of the picture.
4. To save it, click on Back & then click on Save Changes. This will also back up the original picture.
5. So, there you have it! Your dark picture has been changed into a better picture with lightning, with the added benefit of undoing the change whenever. (due to the back-up)
Picasa offers other useful functions too, like redeye reduction, picture straightening, cutting (cropping), etc.
 |
|
| Original Picture | The improved picture |

How to change your Cursor
There are several sites on the Web offering various varieties of cursors for the desktop. After downloading any cursor, you will obviously want to change your cursor to the new one. So, here are the instructions on changing your cursor :
For Windows XP :
1. Click on Start --> Control Panel
2. Open Mouse (in Classic view) or Printers & other Hardware --> Mouse (in Category view)

3. Click on the Pointers Tab
 (Click on the image to maximise it)
4. Click on a type of cursor function
5. Browse --> Select the particular cursor --> OK.

So, this is how you can change your cursor.
Optimizing the Windows Registry
Why is the Windows Registry so important?
The Windows Registry is a very important part of Windows as several programs, Windows Components, etc. use it to store its important settings. Also, the Registry is accessed by the programs extensively too. Therefore, it is very essential to optimize it to maintain its performance. An un-optimized registry can reduce the PC performance.
How does it get cluttered?
With time, the Registry gets cluttered up due to various reasons. Some programs, when uninstalled, are not able to delete its entries present in the Registry. Moreover, the Registry might become cluttered due to broken start menu items, spyware, etc.
How can I fix these problems?
Fixing these problems is very easy with the current generation of Registry care softwares. I would recommend the usage of Glary Registry Repair. It has a very easy to use user interface. You can quickly scan the Registry for several problems & repair them. Before making any repairs, it automatically makes a back-up of the Registry so that you can undo the changes safely. The help file provided by the software explains its usage very effectively.
Alternatively, you can also use CCleaner.
How to remove Windows Messenger from Windows XP (non-service pack)
Windows XP has Windows Messenger installed by default. It sure is very useful if you wish to use it regularly. But for those of us who do not want the utility, the option of removing it is not present in Windows XP (without any Service Pack). Moreover, it starts automatically with Outlook Express resulting into a long delay in starting Outlook. But if you wish to remove Windows Messenger, you can do so.
Disable/Remove Messenger is a powerful little tool that can uninstall or disable Messenger quickly. Usage of the tool is very easy. Download it from the given link. Open the ZIP file & then open the application inside it. Then, select your preferred options & click on Apply. That's it. You can remove Windows Messenger quickly through this tool.
Introduction to the On-screen keyboard
Did you ever feel the need to perform keyboard functions without using the keyboard, or to type something when the keyboard was un-operational? A simple application inbuilt in Windows does the trick. We are talking about the On-screen keyboard.
 (Click on the image to enlarge it)
What is the On-screen Keyboard?
The on-screen keyboard is a very useful mouse-operational utility that can perform all the basic functions of keyboards like typing, performing keyboard functions like Ctrl/Alt/Shift + Alphabet or Function key. ex. Alt + Tab, Alt + Ctrl + Delete, etc.
How do I open the On-screen keyboard?
 (Click on the image to enlarge it)
Click on Start ---> All Programs ---> Accessories ---> Accessibility ---> On-screen Keyboard.
How do I open the On-screen keyboard?
 (Click on the image to enlarge it)
Organising the right-click context menu
What is the Right-click context menu?
The right-click context menu is the menu that appears when you press the right-click button on the mouse. This menu contains a lot of useful options like Cut, Copy, Paste, Rename, Delete, etc. Thus, the right-click context menu is very useful as it facilitates quick changes of certain settings & file management.
Why would I want to organise it?
Many softwares like WinZip, Winamp, etc. add their software's options in the right-click context menu by default. This is definitely useful as we are then able to use these software functions quickly. But, as more & more softwares add their respective functions in the right-click context menu, it starts getting more & more cluttered. Thus, the context menu goes from a simple useful menu to a cluttered & confusing menu.
Therefore, it is advisable to organise the context menu.
How can I organise it?
Normally, organising the Windows context menus is not possible by default. This constraint is removed with the help of a powerful, free software called Mmm. It allows you to effortlessly organise the context menu just like the way we organise files in folders. Thus, it is very simple to use. Download it from here.
How can I use Mmm?
The help file provided with Mmm explains the way to use Mmm in a very easy manner. It should be enough for most people to learn how to use this software.
So, enjoy this little utility which will help to make the Right-click context menu much more user-friendly!
Subscribe to:
Posts (Atom)
Subscribe To


 Posts
All Comments
Posts
All Comments


