Check out my new spiritual blog:
http://www.foodforthoughts.co.in


How to stay safe from Viruses

Viruses are one of the most common problems for the PC users. They are very troublesome since they can result in slowdowns, instability, crashes, data loss, etc. So, here are some basic tips on being secure from viruses :

1. Use a good anti-virus software : This is the preliminary step towards a virus-free PC. AVG & Avast! Home Edition are powerful free anti-virus programs. Both of them provide excellent virus protection for the PC user.

Note : DO NOT use more than 1 anti-virus at the same time. Since anti-viruses offer real-time protection, using more than 1 anti-virus will cause conflicts between them, resulting in crashes. slowdowns & loss of efficiency.

2. Keep your Virus definitions updated before a scan : Virus definitions contain information on viruses for the anti-virus software, including removal details. Since several new viruses are created daily, these definitions are regularly updated by the anti-virus companies. If you scan your PC using old definitions, new viruses will not be detected. Thus, we should keep our virus definitions updated before scanning the PC.

3. Scan your PC regularly : As a general rule, you should scan your PC once a month (with updated virus definitions, of course) to ensure that you are protected from virus infections.

4. Scan removable media before use : Removable media (Pen Drives, CDs, DVDs, Floppies, etc.) are very useful as they facilitate easy moving of data between different PCs. But sometimes, an infected file may get copied onto the removable media. This infection can then spread to the other PCs where it is inserted. Thus, one should always scan any new removable media before copying any of its files to our PC .


Why uninstall is better than delete

Many beginners are confused between the difference in deleting & un-installing a program. Sometimes, they simply delete the entire folder in which the software is located to remove the software. This is wrong. The reason is explained below :-

When a software is installed, the following things are added to your system :

  • The main folder, with the software files.
  • Entries in the Windows Registry, related to the particular software.
  • Some softwares also store settings in My Documents or files in the System folders.
Now, the most natural way to remove the software is by un-installing it, since it removes all the items installed. Simply deleting the main software folder will result in the registry entries & other things remaining intact. These broken items (they are termed as broken since these become useless without the main software) clutter up your PC resulting in slowdown & wastage of space. Several broken items can hamper the PC performance drastically.

That is why, we should un-install the software to remove it.


How to write special symbols like ©, ∆, ™, ¼, etc.

There are several symbols like ±, ∑, ∏, ≠, ® which are unavailable on the keyboard. But, we may need to type such letters sometimes. Fortunately, Windows bundles a software for this purpose, which is very easy to use.

So, to insert special characters :

1. Click on Start --> All Programs --> Accessories --> System Tools --> Character Map.
OR Open 'charmap' (without the quotes) from Start --> Run.


Accessories --> System Tools --> Character Map


Start --> Run --> 'Charmap'


2. Now, select the special symbol that you want. Alternatively, you can search for a particular symbol from the search tab in advanced view. You can even specify the character set to use (including Greek, Arabic, etc.)

3. Click on Select, copy the character, & paste it where you need it.

Or, if you wish to use these characters frequently, you can note down the shortcut key (as shown in the above picture as a red rectangle) for the concerned special character & use it whenever needed.


Converting complex units into easy-to-understand objects

Ultimate unit Converter is a unique site which converts complex technical units into sensible easy-to-understand units.

For ex. entering 1 hectare will give you results like 2 hockey fields, etc. in the Real Objects category. Therefore, we can easily assume the approximate measures of difficult units, due to the usage of commonly-seen units. It is a must-see site for all Internet surfers.


How to brighten a dark picture

Have you ever captured a very dark picture in your digital camera by mistake? You would obviously have wanted to make it more life-like & visible by adding lightning to it. And luckily, you can do so very easily.

There are several tools available for this purpose. I personally use Picasa. Here's a quick walkthrough on adding lightning to a dark picture through Picasa :

1. Open the file from within Picasa.

2. Click on "I'm feeling Lucky".


3. You will now see the improved version of the picture.

4. To save it, click on Back & then click on Save Changes. This will also back up the original picture.


5. So, there you have it! Your dark picture has been changed into a better picture with lightning, with the added benefit of undoing the change whenever. (due to the back-up)

Picasa offers other useful functions too, like redeye reduction, picture straightening, cutting (cropping), etc.


Original Picture


The improved picture


How to change your Cursor

There are several sites on the Web offering various varieties of cursors for the desktop. After downloading any cursor, you will obviously want to change your cursor to the new one. So, here are the instructions on changing your cursor :


For Windows XP :

1. Click on Start --> Control Panel

2. Open Mouse (in Classic view) or Printers & other Hardware --> Mouse (in Category view)


3. Click on the Pointers Tab

Control Panel -- Mouse -- Pointers(Click on the image to maximise it)

4. Click on a type of cursor function
5. Browse --> Select the particular cursor --> OK.

Control Panel -- Mouse -- Pointers -- Browse
So, this is how you can change your cursor.


Optimize the PC using Advanced Windows Care

Why should I use Advanced Windows Care 2 to optimize my PC?
As I had written before in a previous article, the PC tends to gradually slow down & become less efficient. This is caused due to several factors like spywares, obsolete registry entries, junk files, etc. Now, fixing all these problems individually is a very cumbersome task. That's why you should use tools like AWC2, as it can repair the PC for multiple problems quickly.

It can search & repair your PC for :

  • Spywares
  • Un-immunized spywares
  • Obsolete registry entries
  • Unoptimized System Configurations
  • Unneeded Startup items
  • Surfing history/Internet Cache (Temporary Internet files)
  • Junk files


How can I use the utility?

The user interface of AWC2 is very simple. Clicking on the Scan button starts the scanning process of AWC2, which shouldn't take more than 5 minutes. Then, click on the Repair button to repair all the problems found.

Note :

1- Before repairing a particular item, AWC2 makes a back-up of the system, which facilitates easy recovery in case something goes wrong.
2- Also, you can view the un-optimized items separately before the repair if you wish to. You can also instruct the software to de-list certain items, if you want.

Thus, it is highly recommended to use this tool regularly due to its simplicity & powerful features. Use it every fortnight to ensure that your PC remains nice & clean.


Contact Me form added

A brand new 'Contact Me' form, powered by Zoho Creator has been added to PC Beginners. Now, you can contact me anytime if you have any query regarding PCs or you wish to share your feedback with me. You can find the Contact Me link at the bottom of every page in PC Beginners.


Comment on any article

I would like to announce that comments have now been enabled in all the articles of PC Beginners. Therefore, if you wish to know more information related to a particular article or are confused with a certain term used in the article, you can easily comment on the article, by using the comment form located below the article. After entering your comment, it will be moderated by me & then, it will appear below the article. I will try to reply to your comment as soon as possible.

So, start commenting!


Optimizing the Windows Registry

Why is the Windows Registry so important?

The Windows Registry is a very important part of Windows as several programs, Windows Components, etc. use it to store its important settings. Also, the Registry is accessed by the programs extensively too. Therefore, it is very essential to optimize it to maintain its performance. An un-optimized registry can reduce the PC performance.

How does it get cluttered?

With time, the Registry gets cluttered up due to various reasons. Some programs, when uninstalled, are not able to delete its entries present in the Registry. Moreover, the Registry might become cluttered due to broken start menu items, spyware, etc.

How can I fix these problems?

Fixing these problems is very easy with the current generation of Registry care softwares. I would recommend the usage of Glary Registry Repair. It has a very easy to use user interface. You can quickly scan the Registry for several problems & repair them. Before making any repairs, it automatically makes a back-up of the Registry so that you can undo the changes safely. The help file provided by the software explains its usage very effectively.

Alternatively, you can also use CCleaner.


How to remove Windows Messenger from Windows XP (non-service pack)

Windows XP has Windows Messenger installed by default. It sure is very useful if you wish to use it regularly. But for those of us who do not want the utility, the option of removing it is not present in Windows XP (without any Service Pack). Moreover, it starts automatically with Outlook Express resulting into a long delay in starting Outlook. But if you wish to remove Windows Messenger, you can do so.

Disable/Remove Messenger is a powerful little tool that can uninstall or disable Messenger quickly. Usage of the tool is very easy. Download it from the given link. Open the ZIP file & then open the application inside it. Then, select your preferred options & click on Apply. That's it. You can remove Windows Messenger quickly through this tool.


Introducing E-mail subscriptions to PC Beginners

In this modern world, people usually have very less time to spare. And it means that though one may like a particular blog & wish to follow it regularly, one cannot check it due to time constraints. That's where the new service offered by PC Beginners, Subscriptions by E-mail, comes in. You can check it in the right-hand side of the blog in the 'Subscribe to this blog' area.

Once you sign up by entering your e-mail address in the form in the Subscribe by E-mail page, you will be sent a message by e-mail on the day when I have published a new article on PC Beginners. This e-mail will contain the title of the article along with a short paragraph on its content. You can click on the title to read the whole article on the PC Beginners blog.

Therefore, you can follow the blog much more easily through the E-mail service.

Note : You can discontinue this service for your e-mail ID anytime you wish by clicking on the unsubscribe link in the bottom part of any e-mail sent to you through this service.


Introduction to the On-screen keyboard

Did you ever feel the need to perform keyboard functions without using the keyboard, or to type something when the keyboard was un-operational? A simple application inbuilt in Windows does the trick. We are talking about the On-screen keyboard.

(Click on the image to enlarge it)

What is the On-screen Keyboard?

The on-screen keyboard is a very useful mouse-operational utility that can perform all the basic functions of keyboards like typing, performing keyboard functions like Ctrl/Alt/Shift + Alphabet or Function key. ex. Alt + Tab, Alt + Ctrl + Delete, etc.


How do I open the On-screen keyboard?

(Click on the image to enlarge it)

Click on Start ---> All Programs ---> Accessories ---> Accessibility ---> On-screen Keyboard.


Revamp your Desktop with Object Dock

Object Dock is a powerful free software that fully revamps your desktop so that you do not need the traditional icons anymore. It adds an attractive docklet to your desktop, in which you can place icons easily.

Here are some of its Features :

You can directly drag files or icons from the desktop to Object dock. This technique is called Drag & Drop.

The docklet can be positioned at four positions of the desktop,ie., top, bottom, left & right.

The auto-hide feature of Object Dock hides the docklet when not in use. To show it, you have to move the mouse pointer over the position of the docklet. This will show the docklet again till the mouse cursor hovers over it.


Therefore, Object Dock is a feature-rich software. The docklet with its animation effects will make your desktop experience more easier.


Refreshen your mouse cursor

Are you bored of the same old white cursor on your desktop? Then, it's time to change it into an interactive animated one. StarDocks CursorFX is a powerful free software that offers a wide range of cursors with delightful animations.. Changing the cursor is very easy from within the software interface. You can revert back to the original Windows cursor very easily too. Download it from here.

The software, being free, does have some minor limitations though. We are unable to add certain extra effects to it or change the cursor settings (size, colour, etc.). But, the free effects along with the cursors make CursorFX a must-have visual add-on for every modern desktop. So, get it now & enjoy the new cursors!


Organising the right-click context menu

What is the Right-click context menu?

The right-click context menu is the menu that appears when you press the right-click button on the mouse. This menu contains a lot of useful options like Cut, Copy, Paste, Rename, Delete, etc. Thus, the right-click context menu is very useful as it facilitates quick changes of certain settings & file management.

Why would I want to organise it?

Many softwares like WinZip, Winamp, etc. add their software's options in the right-click context menu by default. This is definitely useful as we are then able to use these software functions quickly. But, as more & more softwares add their respective functions in the right-click context menu, it starts getting more & more cluttered. Thus, the context menu goes from a simple useful menu to a cluttered & confusing menu.

Therefore, it is advisable to organise the context menu.

How can I organise it?

Normally, organising the Windows context menus is not possible by default. This constraint is removed with the help of a powerful, free software called Mmm. It allows you to effortlessly organise the context menu just like the way we organise files in folders. Thus, it is very simple to use. Download it from here.

How can I use Mmm?

The help file provided with Mmm explains the way to use Mmm in a very easy manner. It should be enough for most people to learn how to use this software.


So, enjoy this little utility which will help to make the Right-click context menu much more user-friendly!


How to add an RSS feed in Mozilla Firefox

1. When you visit a site which offers RSS feeds (like PC Beginners), you will see the RSS icon in the right-hand side of the Address bar.

Mozilla Firefox : Address bar with the RSS icon

2. Click on it. If the site offers more than one feed, you will see a list of the RSS feeds offered. Click on the feed that you wish to subscribe to.

3. You will now see a description of the RSS feed.

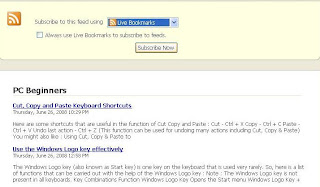
4. You will also have an option to select the RSS reader of your choice. For basic PC users, Live Bookmarks is the best.

Mozilla Firefox : Select RSS reader
(Click on the image to maximize it)

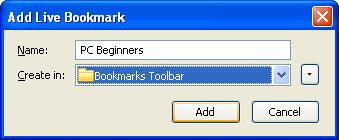
5. Now, click on the 'Subscribe now' button. Then, you can specify the location where you wish to have the RSS feed. You will have two options, the Bookmarks menu or the Bookmarks toolbar. After selecting the preferred option, click on Add.

Mozilla Firefox : Add Live Bookmark dialog box

(Click on the image to enlarge it)
Bookmarks Toolbar

(Click on the image to enlarge it)
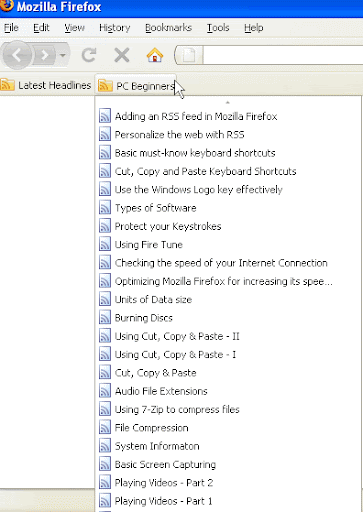
Bookmarks Menu


There you have it, the RSS feed has been added! Now, whenever you open Firefox, the RSS will get updated. If you wish to update it manually, you can right-click on the concerned feed & click on 'Reload Live Bookmark'. Enjoy this powerful feature, RSS!


Personalize the web with RSS

RSS IconWhat is RSS?


RSS (Rich Site Syndication) is a very useful little invention of the Web. It simply syndicates the articles on blogs or news sites & presents it to you in a compact way in your web browser itself. You are shown the titles of the latest articles of the respective websites. To view the main content, you can click on the respective title which will direct you to the article in the concerned website.

Therefore, there's no need to visit the concerned web-site to view its latest articles. It is immensely useful if you are the type of user who visits various types of sites daily to view its latest articles. Generally, you can have infinite amount of RSS feeds in your web browser.

Here's an example of an RSS Feed :


(Click on the image to maximize it)


Here, the RSS feed of PC Beginners has been shown. As you can see, the titles of the latest articles can be viewed through RSS. Clicking on a title will direct you to the article on the concerned website.


How to add an RSS feed?

For Mozilla Firefox


Basic must-know keyboard shortcuts

Here is a list of the basic Keyboard shortcuts that are used, along with their respective functions :

Key Combination Function
Ctrl + X Cut
Ctrl + C Copy
Ctrl + V Paste
Ctrl + Z Undo
Alt + Tab Switch between open windows
Alt + F4 Close active window
Ctrl + Esc Open the Start menu
Alt + Ctrl + Del Open the Task Manager
Ctrl + A Select all


Cut, Copy and Paste Keyboard Shortcuts

Here are some shortcuts that are useful in the function of Cut Copy and Paste :

Cut - Ctrl + X
Copy - Ctrl + C
Paste - Ctrl + V
Undo last action - Ctrl + Z (This function can be used for undoing many actions including Cut, Copy & Paste)

You might also like :

Using Cut, Copy & Paste to move data from one place to another
Using Cut, Copy & Paste to make a copy of data
Cut, Copy & Paste Basics


Use the Windows Logo key effectively

The Windows Logo key (also known as Start key) is one key on the keyboard that is used very rarely. So, here is a list of functions that can be carried out with the help of the Windows Logo key :

Note : The Windows Logo key is not present in all keyboards.

Key Combinations

Function

Windows Logo Key

Opens the Start menu

Windows Logo Key + F1

Help & Support

Windows Logo Key + R

Run dialog box

Windows Logo Key + M

Minimize all windows

Windows Logo Key + E

Windows Explorer

Windows Logo Key + F

Find files or folders

Windows Logo Key + D

Minimizes all open windows and displays the desktop

Windows Logo Key + TAB

Cycle through taskbar buttons

Windows Logo Key + Break

System Properties dialog box

Windows Logo Key + U

Opens the Utility manager


Types of Software

As you know, there are numerous softwares available for various purposes. The softwares are classified by many ways like license, utility, etc. Today, I will explain the license aspect of classification of softwares.

Freeware - The softwares which are available to you completely free of charge with all its features enabled for unlimited use are called freewares.

Retail : The softwares which have to be bought for their usage are called Retail softwares.

Trailware - The softwares which are also available for free but can only be used for a limited amount of times or for a limited duration are called trialwares. Such softwares are created so that users can try out the features of the retail version to know whether the software is useful for them or not.

Demo -: The free software where only few features of the retail version of the same software are enabled is called a demo. It can be used unlimited number of times. These softwares are created to give a glimpse of the retail softwares.


Protect your Keystrokes

As you know, the Internet is used for several productive purposes these days. This includes the usage of credit cards for online purchasing, operating bank accounts through the Internet, etc. Most of the sites that need bank or credit-card information use a strong 128-bit (or 256-bit, in some cases) encryption technique which protects the information entered into the site from unauthorized use by outsiders. But, there are still some sites which do not use such a technique. Thus, the information entered in such sites can be exploited. Hackers can misuse such sensitive information to withdraw money from our bank account & credit card or to use your e-mail account.

In addition to this, there are certain spywares which track your keystrokes & send it to unscrupulous websites. Keystrokes means the buttons pressed on the keyboard. Thus, information like passwords entered are included in keystrokes. Thus, such websites can make use of your personal accounts for their purpose. Though most spywares can be removed by use of anti-spyware softwares, some spywares may still remain on the PC.

Thus, it becomes highly essential to protect your keystrokes. This can be done by encrypting your keystrokes at the moment when they are entered. A powerful keystroke encryption extension for Mozilla Firefox is KeyScrambler. It is highly recommended to use it.


Using Fire Tune

1. After downloading & installing the tool, open it.

2. First of all, back up the default settings of Firefox by clicking on the 'Create backup of configuration' button. This will enable us to revert back to the previous settings if the results of optimization are not satisfactory.

3. Now, you will have to select the speed of your PC (CPU & RAM) & the Internet.

To find out the amount of RAM & CPU that you have, click on Start ---> Right click on My Computer ---> Click on Properties. (Or you can press Windows Logo key + Pause) Now, in the 'System' area, you can view the CPU speed in MHz/GHz & RAM in MB/GB.

To check your Internet speed, read this article.

4. Now, select the appropriate combination of the speed of your PC & of your Internet connection, using the table given below :


Fast

Slower

Slow

CPU

1.5 GHz +

-

Less than 1.5 GHz

RAM

512 MB +

-

Less than 512 MB

Internet Connection

300 KB +

100-200 KB

10-25 KB


Note : Here, KB stands for kilobytes.

Now, close Mozilla Firefox if it is open & then click on 'Tune it'. And there you have it, you have just optimized Mozilla Firefox through Fire Tune. Enjoy the speedier performance of Mozilla Firefox!


How to check the speed of your Internet Connection

Sometimes, you may want to check the speed of your Internet connection.

Here is a list of the websites that you can use to check the speed of your internet connection :

Speed Test
Bandwidth Place
Kify
My Speed
Test my Speed

After the test finishes, you will be given your Internet speed in kilobits (Kb). You will have to convert it into kilobytes (KB) to know the actual speed. You can check this article for the difference between kilobits & kilobytes.

Note :

While running the speed test, do not use the Internet for any other purpose. This is because the websites generally check your Internet speed by simply downloading & uploading a file. The speed of this download/upload is considered as the speed of the Internet connection. As such, if you use the Internet for other purposes like downloading, surfing, etc. while testing the Internet connection, the speed test will get a lower share of your Internet connection, thereby affecting the results of the Internet speed check giving inaccurate results.


Optimizing Mozilla Firefox for increasing its speed & efficiency

So, here's an article on the powerful tool that optimizes web browsers like Internet Explorer & Mozilla Firefox to increase their speed & efficiency. Fire Tune is a very effective tool that can increase your Internet surfing speed considerably. With just a few clicks, you can optimize the web browser to suit your PC.

How does it work?

The mechanism behind this tool is simple. Web Browsers are generally meant for a large audience. As such, they do not have the exact settings to match your particular PC for its optimum performance. So, we need to correct this by optimizing the web browser. Now, optimizing isn't an easy task at all. We have to try out many different settings in different areas in different combinations. Obviously, such a process is very laborious & time-consuming. That's where Fire Tune comes in. Just by mentioning the type of your CPU/RAM and the speed of your Internet connection, it optimizes your web browser using the guidelines given by experts to provide you with a speedy surfing experience.

How to use it?

Read this article.


What is the meaning of KB, MB, GB, etc.?

The computer terms such as KB, MB, etc. can be slightly confusing for the PC Beginner. So, here's a little elaboration on these units.

The PC measures the size of the data in terms of its own units called bytes. The collection of these bytes is known as kilobytes (KB), Megabytes (MB), etc. The detailed list of the units for size of data with their full-forms & size, for your understanding, is given below :

Acronym

Full Form

Size

B

Byte

1 byte

KB

Kilo byte

1 KB = 1,024 bytes

MB

Mega byte

1 MB = 1,024 KB

GB

Giga byte

1 GB = 1,024 MB

TB

Tera byte

1 TB = 1,024 GB

PB

Peta byte

1 PB = 1,024 TB

EB

Exa byte

1 EB = 1,024 PB

ZB

Zetta byte

1 ZB = 1,024 EB

YB

Yotta byte

1 YB = 1,024 ZB


Burning Discs

Adding data to CDs/DVDs ie., Burning CDs/DVDs is a very easy task. For it, you need a CD/DVD writer & a CD/DVD burning software to instruct the hardware to burn a CD properly. There are several softwares available for this function.

I would recommend you to use CD Burner XP which is a very effective free software. It provides all the basic features needed for disc burning, coupled with a very easy-to-use interface. Thus, most users will find it comfortable to use it for disc burning. You can download it from their site.

Using the software is very easy. The help page on its website provides a comprehensive guide on using the software for various kinds of functions. It will provide you with almost all the information you will want regarding the usage of CD Burner XP.


Using Cut, Copy & Paste to move data

B) Using Cut, Copy & Paste to move data from one place to another.

1) First of all, select the text, files, folders and/or drives that you wish to copy.

2) Right-click on them & click on Cut or you can also click on Edit ---> Cut for the same purpose. This will copy the information of the data into the Clipboard.

3) Then, right click on the folder/drive/program that you wish to put the copied data into & click on Paste. Or you could also open the folder/drive & then click on Edit ---> Paste. This will put the data into the folder & delete the data from its original position.

4) Thus, you have moved the required data in the required location.


Using Cut, Copy & Paste to copy data

A) Using Cut, Copy & Paste to make a copy of any data :


1) First of all, select the text, files, folders and/or drives that you wish to copy.

2) Right-click on them & click on Copy or you can also click on Edit ---> Copy for the same purpose. This will copy the information of the data into the Clipboard.

3) Then, right click on the folder/drive that you wish to put the copied data into & click on Paste. Or you could also open the folder/drive & then click on Edit ---> Paste.

4) Thus, you have made a copy of the required data in the required location.


Cut, Copy & Paste Terms

To understand how to use Cut, Copy & Paste on files, you need to understand the following concepts :

Clipboard : The Clipboard is a place where the information regarding data (text, images, music, videos, etc.) can be stored temporarily.

Paste : This command puts the data from the clipboard (if any data is present on the clipboard) into the folder/drive/editor where this command is used.

Copy : This command copies the specified data into the clipboard. Then, when the paste button is used, the clipboard data is put into the folder/editor/drive where the command is used. So, we get 2 copies of the same file., the original & the new copied file.

Cut : This command works nearly the same as Copy. The only difference is that the file/folder on which the Cut command was used gets deleted after using Paste. Thus, we get only 1 copy of the file, the new copied file. The original file gets deleted.


Audio File Extensions

As with videos, audio files too have become increasingly diversified with the passage of time. And the PC Beginner may find it tough to remember all of them. So, here is a list of the common audio formats in use currently :


Audio Extension

Type of Format

Description

MP3

MPEG Layer-3

The standard audio extension which is used widely in music, having a high compression ratio

WAV

Waveform Audio

The basic uncompressed audio format.

WMA

Windows Media Audio

The audio format created for Windows by Microsoft.

MIDI / MID

Musical Instrument Digital Interface

The audio format used for musical instruments. It’s size is low as it does not contain the sound itself but just the information for the CPU about the sound to be played .

AMR

Adaptive Multi-Rate Narrow Band

The file format used by sound recorded in Nokia Mobile Phones

AAC

Advanced Audio Coding

The format that is used by Apple, Sony & Nintendo which is designed to be a successor to MP3.

RA

Real Audio

The audio format created by Real Networks.


Using 7-Zip to compress files

7-Zip is a popular file compression software that specializes in the creation of compressed archives with the file extension *.7z. This type of compressed archive is well-known due to its high compression ratio, ie., it can compress the file size more than most other compression formats. Download it from here. Be sure to download the correct version. The majority of computers are 32-bit, so download the basic 32-bit version of 7-Zip. After downloading it, install it.

Now, to compress a file using 7-zip, follow these steps :

1. Select the files & folders that you wish to compress.

2. Open their right-click context menu ie., right-click on them.

3. Go to 7-Zip ----> Add archive.

4. A window will appear.

a) Select the desired location of the archive at the top of the window in the archive area.

b) Select the Archive format that you want. 7z is recommended due to its high compression ratio. Note that though 7z is recommended, few softwares (like 7-zip & WinRar) support the unpacking of these files. So, you could also use the Zip format as it is widely supported.

c) Select the compression level. It is recommended to use the Ultra level for the maximum compression ratio. It will take the maximum time, but for maximum compression ratio, it is worth the wait.

d) You can use the other features too, like securing the archive through a password from the 'encryption' area & splitting archive files to make it suitable for its data transmission through a Floppy/CD/DVD from the 'split to volumes, bytes' area.

d) It is best for Beginners to let the other options be as it is.

5) Click on OK. The process of creation of the compressed archive will now begin.

6) After the completion of this process, your required compressed archive will be saved in the location that you had selected. You can now open this archive through 7-zip or WinRAR.


So, creating a compressed archive is very easy.


File Compression

The current hard discs have a lot of space available for storage. Better hard discs with more capacity & lower costs are continuously being developed. In spite of that, hard disc space gets used up quickly because of more content available on the Internet & the increasing speed of Internet connections. Therefore, File compression should be used to reduce the size of rarely used data.

File Compression is an advanced technique by which the size of a file is reduced by an encryption/decryption method. There are various softwares available for the creation of compressed archives. The most popular compression softwares are WinZip, WinRar & 7-Zip. It is recommended to compress all rarely used files with maximum compression to efficiently use your hard disk space.

To learn how to use 7-Zip to compress files, see this article.


System Informaton

The modern computer works with the help of several important hardwares & softwares. Generally, PC Beginners are unaware about the details of the hardwares/softwares on their computer. But sometimes, it becomes absolutely essential to know details of a particular software or hardware when it has some problems. It becomes a laborious task to find out all the details of all the hardwares/softwares, as one needs to navigate to different areas on the PC. That is why, to view System Information, we should use a System Information program, to check the details of the System in one place.

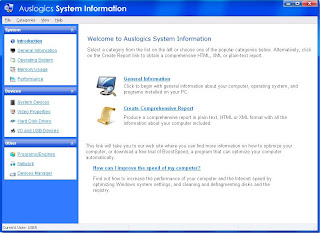
AusLogics System Information : This is probably the best tool available for viewing PC information which is free as well. It gives a comprehensive collection of the system information, presenting it in a very systematic & logical manner. All the information is arranged neatly in different pages, which can be navigated easily.

AusLogics System Information : Main Window(Click on the image to enlarge it)

Note : Screen shots used with permission from AusLogics.


Basic Screen Capturing

Have you ever felt the need to take a snapshot of the computer screen? Such a snapshot can be very useful to catch an error message on a picture.

To do this, press the Print Screen button (PrtScn) on your keyboard. This will copy the whole screen into the clipboard (?). Paste it into an image-editing software & save the image. Thus, you can take a picture of the screen easily.

To take an image of only the current active window, thus excluding the taskbar, icons, etc., press Alt + PrtScn. This will copy the active window's screenshot on the clipboard.


Video File Extensions

With the increasing storage spaces & the introduction of YouTube, Videos have become increasingly popular with the current generation. But, the extensions of videos have become increasingly diversified as well. It might be a bit tough for the PC Beginner to remember all the video extensions. So, here is a list of the common video formats used. To run some of these videos extensions., you will need a codec pack. For more information on codecs, visit Playing Videos - Part 1.

Video Extension

Type of Format

MPEG / MPG

Motion Pictures Exchange Group

MOV

QuickTime Video

RM

Real Media

DAT

VCD Format

VOB

DVD Video Format

WMV

Windows Media Audio/Video file

AVI

Audio Video Interleave

3GP

Third Generation Partnership Project

MP4

MPEG – 4 Part 14

GVI

Google Video File

SWF / FLV

Flash Video


Playing Videos - Part 1

Most of the current generation videos use an encryption technique to protect their videos. To view such videos, the media programs need a decryption algorithm, Such an encryption/decryption algorithm is termed as 'codec'. Since different video makers use different codecs, there are a wide array of codecs available on the Internet to play different types of videos. Obviously, downloading new codecs for all new videos is a tedious task. That is why, opting for a comprehensive codec pack is a better option. K-Lite Codec Pack is considered as the most effective codec pack by many.

There are four versions of the K-Lite Codec Pack: Basic, Standard, Full and Mega.

K-Lite Codec Pack Basic contains only the essential codecs. It has the lowest size.

K-Lite Codec Pack Standard contains all the codecs you need to play all the commonly used formats.

K-Lite Codec Pack Full contains most codecs & is suitable for high-end video users.

Download these 3 packs from here :
http://www.codecguide.com/download_kl.htm
http://www.free-codecs.com/download/K_Lite_Codec_Pack.htm

K-Lite Mega Codec Pack contains all the important codecs to play commonly used formats as well as formats which are used rarely. It has the highest size & is suitable for video experts. Download this pack if you want the most comprehensive K-Lite Codec Pack.

Download :
http://www.free-codecs.com/download/K_Lite_Mega_Codec_Pack.htm
http://www.codecguide.com/download_mega.htm


Keep your registry defragmented

Earlier, I had published an article explaining the importance of Disk Defragmentation. And just like the hard drive, the Windows Registry too gets fragmented with time due to the constant use of it by several programs. Most of the programs & the Windows utilities store their settings on the Windows Registry. Thus, the Registry should be defragmented regularly to ensure optimum PC performance.

Auslogics Registry Defrag is a free, quick & powerful software for Registry defragmentation.

To use it to de-fragment the registry :

1) Open AusLogics Registry Defrag.

AusLogics Registry Defrag : Main Window

2) Click on Next.

3) A dialog box will appear asking you to close all running programs. So, save your work, close all active programs & click on OK.

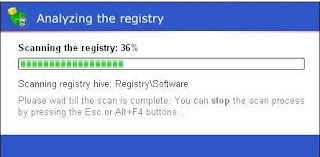
4) AusLogics Registry Defrag will now scan your registry for fragmentations. This will take around 5 minutes at the most.

AusLogics Registry Defrag : Scanning the Registry

5) You will then be provided with an analysis report of the Registry. You will also be shown the amount of registry space that can be reduced & the percentage of performance increase possible.

AusLogics Registry Defrag : Registry Scan Report

6) Click on Next to start defragmentation.
7) Your registry will be backed up. You will be asked to restart the PC. Do so by clicking on Yes.
8) After the restart, you will be given a report of Registry Defragmentation.
9) Click on Finish after viewing the report.

Note : Screen shots used with permission from AusLogics
.


Hello! Welcome to PC Beginners. Here, some useful tips for your PC will be given. This blog is meant for everyone, but it is mainly for those people who have little experience with computers. I am sure that your stay on this site will be a pleasant one!


HomeMobile version | RSS
Contact Me | Terms of Use |  Privacy Policy
Do more with Windows / Internet / Information


Blog Archive

Blogger logo Firefox 3 CCleaner - Freeware Windows Optimization Anti Spam